In order to become a member of the initiative it is essential that the expert has either used the Quadriceps tenton autograft for Ligament reconstruction in surgical practice or/and has published papers on the subject.
Each application will be processed and answer will be given in the shortest time possible
Prof. MD John "X" W. Xerogeanes
Published in paper:
Slone HS, Ashford WB, Xerogeanes JW. Minimally Invasive Quadriceps Tendon Harvest and Graft Preparation for All-Inside Anterior Cruciate Ligament Reconstruction. Arthroscopy techniques. 2016;5(5):e1049-e56.
Xerogeanes and associates have developed a special minimally invasive technique for graft harvest for all-inside ACL reconstruction. Generally, all-inside technique is considered to cause less surgical trauma and bone removal, leading to less postoperative pain and improved cosmetics. It requires shorter grafts and since shortening the BTB graft proves to be difficult, QT graft appears to be an ideal choice for this technique. The possibility of determining the length and volume of quadriceps tendon in magnetic resonance imaging, prior to the surgery also present a significant advantage to its application, when talking about all-inside reconstruction. Xerogeanes routinely conducts preoperative MRI measurement of the Quadriceps tendon at mid-sagittal plane, 3cm proximal to the superior pole of the patella as presented in the following description of the technique. This area has been recognized as the point of representable tendon thickness in the previous study published by Xerogeanes et al.
“Anatomic and Morphological Evaluation of the Quadriceps Tendon Using 3-Dimensional Magnetic Resonance Imaging Reconstruction Applications for Anterior Cruciate Ligament Autograft Choice and Procurement”, published in American Journal for Sport Medicine.
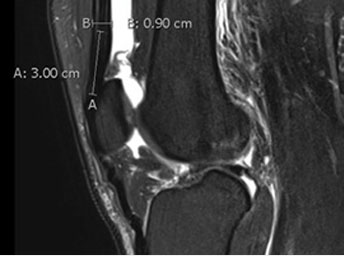
The thickness of the quadriceps tendon graft can be measured by the thickness of the tendon at the midsagittal patella, 3 cm proximal to the proximal pole of the patella.
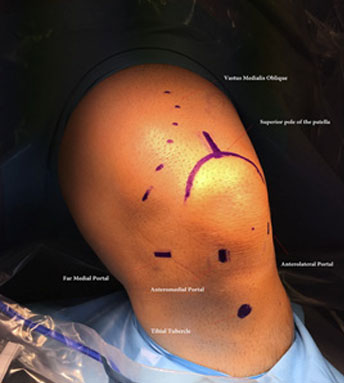
With the leg flexed to 90, the vastus medialis oblique is palpated and its border marked. The proximal pole and the medial and lateral borders of the patella are marked. Keep in mind the importance of distinguishing the lateral border of the patella from the lateral trochlear ridge. A 2-cm vertical mark is made extending proximally from the proximal pole. At this point, our anterolateral, anteromedial, and far medial portal sites may also be marked.
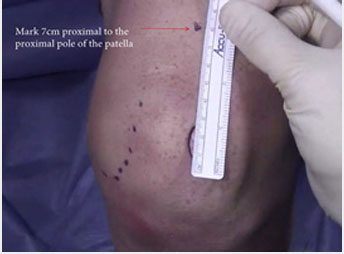
Measurement is performed 6.5 cm proximal to the proximal pole of the patella and a mark is made. The skin should tranilluminate at least this far up when the arthroscope is inserted to confirm a graft length of >6.5 cm.
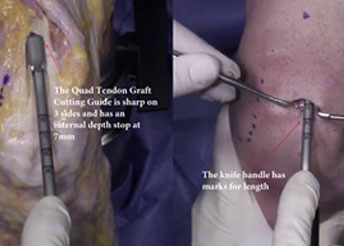
The Arthrex quadriceps harvest knife is sharp on 3 sides and allows for either a “pull” or “push” technique for cutting the tendon. The tendon may be cut either proximally to distally or the reverse. We recommend the “push technique.” The blade is designed to prevent the operator from cutting the tendon too deep. After the cut is made, the 2 vertical incisions just off the superior pole of the patella are connected using a No. 15 blade. There is a thin layer of fat between the tendon and capsule. If a patch of fat is encountered, the surgeon should be alerted that it is through the tendon and should avoid deeper dissection or the risk of capsular violation.
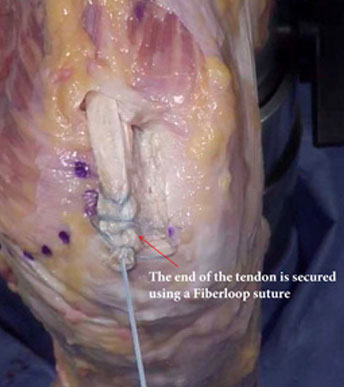
Once several centimeters of graft have been freed from the distal tendon, a FiberLoop suture is used to whipstitch the tendon (4 throws), starting 2 cm proximal to the tendon end
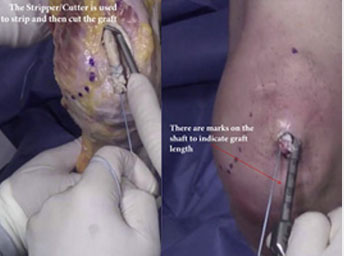
The stripper/cutter is designed to strip and then cut the graft from distal to proximal once the desired graft length is achieved. There are marks on the handle to indicate length.Once the desired length is stripped.The handle is squeezed, and the graft will be cut from the quadriceps tendon. For an allinside technique, we generally prefer to harvest 6.5-7 cm in length. If the harvested graft is longer than this, it should be shortened.
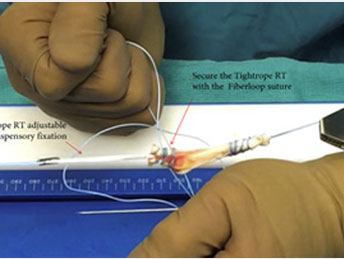
Graft preparation Fig 7. We prefer adjustable loop suspensory fixation as this provides room for graft adjustment in both the femoral and tibial tunnels after graft passage. The previously placed FiberLoop suture is passed through the loop of the TightRope RT and the needle is passed through the central portion of the graft exiting the surface 5 mm away from the end of the graft. Throw 3-4 whipstitches in the graft and then cut the needle from the suture. Wrap the 2 limbs of the suture around the graft in opposite directions and tie to each other. If desired, the end suture can be threaded through a needle and the knot can be shuttled into the substance of the tendon before cutting the tails.
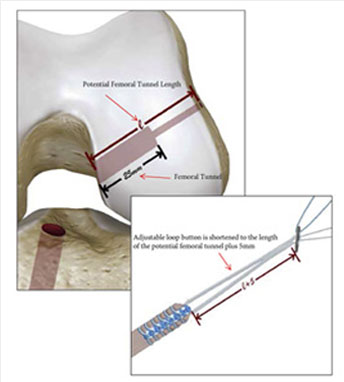
All-inside reconstruction Fig 8. Illustration of the potential femoral tunnel length represented by “e.” The adjustable loop button is adjusted to be the length of the potential femoral tunnel plus 5 mm. The reason for adding 5 mm is to allow the button to completely exit and engage the lateral femur, but also not have so much slack that it can be pulled through the iliotibial band inadvertently. The depth of the drilled tunnel should be approximately 25 mm, as 20 mm of graft needs to be able to fit inside the tunnel.
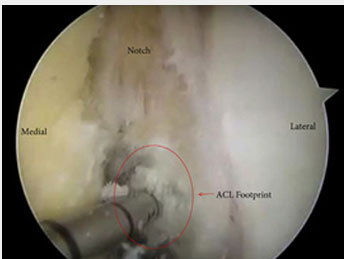
Viewing from the anterior medial portal with the arthroscope and drilling through the far medial portal, we drill the femoral tunnel in the center of the bifurcate ridge in the center of the anterior cruciate ligament (ACL) femoral origin. The tunnel is drilled to 25 mm. The average “potential tunnel length” is normally 30-40 mm, but no more than a 25-mm tunnel is needed for a 7-cm graft.
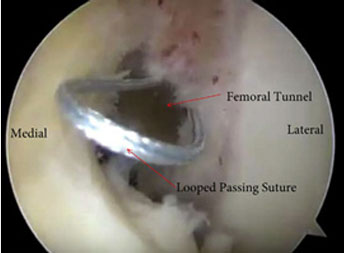
A looped passing suture is pulled through the newly drilled femoral tunnel until the loop is visible at the mouth of the tunnel. This will be used to grab the sutures of the TightRope RT to pull through the femoral tunnel.
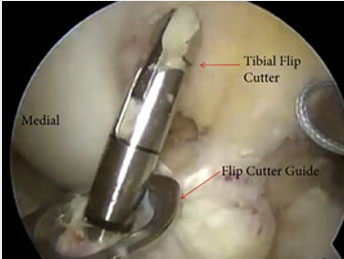
Viewing from the anterior lateral portal, the tibia footprint is identified and marked with an awl approximately 2 mm anterior to the posterior aspect of the anterior horn of the lateral meniscus. The tibial flip cutter guide is placed via the anterior medial portal and the flip cutter device is drilled into the knee, deployed, and a 25-mm tibial tunnel is prepared. After this is accomplished, another looped suture should be introduced through the tibial tunnel and pulled through the far medial portal.
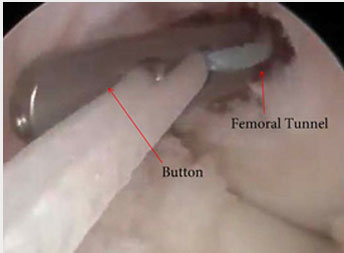
Sutures from the TightRope RT are threaded through the looped suture in the femur and pulled out the lateral thigh. The graft is pulled through the far medial portal until the graft reaches the intra-articular portion of the femoral tunnel. The button should be deployed on the lateral cortex of the femur. The graft is pulled into the tunnel until the sutures are no longer visible. This ensures that at least 20 mm of graft is in the tunnel.
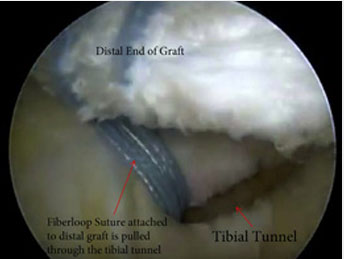
After the femoral side is secured, the sutures from the distal end of the graft are placed through the loop of the tibial passing suture and pulled through the tibia. The graft is pulled into the tibial tunnel and the FiberLoop sutures should be in the tunnel ensuring that 20 mm of graft is in the tunnel.
 Become a member